
Configure Smart Card Logon on Windows Domains
Dec 2022 - Update to Microsoft Network Authentication Issue
The Microsoft KB mentioned above is updated. Note that the "disabled" mode retirement is still targeted at 2/14/23. CISA encourages any agency still reliant on "disabled" mode to move to "compatibility mode" by following the CISA Guidance as soon as possible while a timeline and plans around long term resolution of this issue is finalized with Microsoft. Additional technical guidance can be requested through cyberlaison at CISA dot DHS dot gov.
May 2022 - Known PIV Network Authentication Issue
Some PIV-based authentication to Microsoft Domain Controllers are impacted by May 2022 Windows server patches. If you encounter these PIV network logon issues, please review the CISA Guidance which is supported by the following KB5014754—Certificate-based authentication changes on Windows domain controllers page. Additional technical guidance can be requested through cyberlaison at CISA dot DHS dot gov.
Introduction
These Windows Domain configuration guides will help you configure your Windows network domain for smart card logon using PIV credentials.
There are many useful pages and technical articles available online that include details on configurations and using generic smart cards. The information presented here addresses common questions and configurations specific to the U.S. federal government, PIV smart cards, and U.S. federal civilian agency certification authorities.
Teamwork
Work with your Network Engineers, Domain Admins, Account Management, and Information Security colleagues to review the information, perform the configurations, and troubleshoot any issues.
Pre-Launch Checklist
Check the following items before reviewing these network guides and lessons learned:
- Users have PIV credentials and PIV card readers.
- You are using Microsoft Active Directory to manage your Windows network.
- Domain Controllers are Microsoft 2012 or newer.
- User workstations are joined to your network and are Windows 8 or Windows 10-based.
Configuration Checklist
There are five configuration categories to review with your colleagues. All five include steps that must be completed; it’s best to review and complete the configuration categories in this order:
- Network Ports and Protocols
- Domain Controllers
- Trust Stores
- Account Linking: Associating PIV credentials with User Accounts
- Group Policies and Enforcement
There are five additional guides:
We want to add additional information for installing Online Certificate Status Protocol (OCSP) services, addressing common errors and troubleshooting, and configuring MacOSX and other operating systems.
Submit an Issue to identify information that would be helpful to you, or consider contributing a page to these guides with your lessons learned.
Step 1 - Network Ports and Protocols
Your workstations, servers, network domain controllers, and applications need to validate the revocation status of the PIV certificates and all intermediate certificate authority (CA) certificates. In addition, the certificate chain path building may retrieve and download the intermediate CA certificates.
The validation occurs in real time (with some caching) and requires ensuring network traffic is open and available to the destination web services, ports, and protocols. Many U.S. federal agencies implement a layered network security model with demilitarized zones (DMZs), proxies, and Trusted Internet Connections (TICs) to monitor, defend, and protect the networks, applications and users.
Verifying and Troubleshooting
Non-accessible endpoints for the web services due to firewalls blocking access is a very common root cause for errors. If you encounter user errors including “Cannot validate” and similar domain controller errors, your first troubleshooting step should be to verify your network and access.
nslookup and certutil are your friendly tools
Restricted or denied access to Internet web services including the OCSP and CRL web services used in the certificate validations lead to common errors and issues. Collaborate with your Network Engineers to review the web services, IP addresses, ports and protocols, and verify access from all local and wide-area network segments.
It is simple to begin troubleshooting if the web services endpoints are accessible or blocked by firewall rules. You have the basic four utility tools for troubleshooting:
- certutil (Microsoft)
- openssl
- nslookup
- tracert
For the typical network domain, certutil will be your best option to identify a number of possible root causes. There are many options available in the certutil utility tool, and two are covered here.
Export your public key and certificate for PIV Authentication to a .cer file (mypiv_auth.cer), and run the following command in a command line from workstation(s) and domain controller(s):
certutil -verify -urlfetch mypiv_auth.cer >>verify_piv.txt
The text file output will include a full check against all options for CRLs, OCSP, intermediate certificates to verify a trust chain, and the root (COMMON). Review all items and ensure at least one successful verification message is included for each check. You may see errors for the LDAP verifications and these can be ignored if a CRL or OCSP check is successful.
Time is important
When reviewing the verification messages, you should pay careful attention to the time. For example, if a CRL file is not downloaded in under 15 seconds, it is very likely that you will encounter network authentication errors and will need to perform some tuning.
There is also a graphical user interface to help perform these verification checks.
certutil -v -url mypiv_auth.cer
The graphical user interface allows you to check OCSP, CRL, and AIA (intermediate certificate retrievals).
Can federally operated certificate revocation services (CRL, OCSP) operate on port 80?
Yes. This very narrow class of services, that provide CRL and OCSP information for the purposes of verifying the revocation status of certificates used to make other HTTPS connections, should abide by best practices in the field and their respective specifications. For CRLs, follow RFC 5280 which states CAs SHOULD NOT include URIs that specify https, ldaps, or similar schemes in extensions. For OCSP, follow RFC 6960 which states a CA may use port 443 for OCSP where privacy is a requirement. Agencies are encouraged to operate OCSP and CRL services via hostnames specifically reserved for those services, so that other related information and functionality can be served securely and privately. For more information see the Federal CIO Council HTTPS-Only Standard .
Web Services for Validating PIV Certificates
Revocation) status is validated using using either Online Certificate Status Protocol (OCSP) or Certificate Revocation Lists (CRLs). To meet your initial network requirements, you should ensure the OCSP and CRL URLs included in your agency users’ PIV Credential Certificates are accessible from all workstations and domain controllers.
| Type | Certificate Extension | Protocol (Port) | Considerations |
|---|---|---|---|
| OCSP | Authority Information Access | HTTP (80) | All PIV certificates have OCSP references and OCSP URLs which are Internet accessible and provided by the issuing CA. Intermediate CAs are not required to have OCSP available for the intermediate certificates. |
| CRL | CRL Distribution Point (CDP) | HTTP (80) | All PIV certificates have CRL capabilities provided by the issuing CA. All intermediate CA certificates have CRL capabilities. CRL files have an expiration time that varies between 6 to 18 hours. CRL file sizes range from a few kilobytes to more than 30 megabytes (MB). |
Lightweight Directory Application Protocol (LDAP) for retrieving information is not preferred and has been increasingly deprecated; therefore, LDAP is not included.
There are dozens of OCSP and CRL URLs for all issued PIV credentials. If you have users with PIV credentials from other agencies or partners, identifying all the URLs to verify against your network configurations will be more complex.
Web Services for the Federal Public Key Infrastructure
The Federal Common Policy Certificate Authority G2 (COMMON) is the root certificate authority and has web services to publish both certificate chains (p7b files) and CRLs for all intermediate certificate authorities which the root signs.
To enable communications with these Federal Common Policy Certificate Authority services, including those currently operational and any expansion, you should verify outbound communications to the base domain of http.fpki.gov. For example, a successful connection to http://repo.fpki.gov/fcpca/fcpcag2.crt will download a copy of the Federal Common Policy CA certificate.
You should consider allowing two protocols (ports): HTTP (80) and DNS (53). Although the web services for publishing CRLs are not currently served over HTTPS (443), you may want to allow HTTPS (443) to future proof for any expansion.
Step 2 - Domain Controllers
To use smart cards and PIV credentials for network authentication, all domain controllers need to have domain controller authentication certificates.
Devices authenticate too!
When your users are using certificates to authenticate to the network, the domain controllers are also authenticating as devices using certificates. Each works together to create secure connections. To learn more, search for online resources that discuss Public Key Cryptography for Initial Authentication (PKINIT) protocols.
This page contains information on domain controller certificate profiles and issuing domain controller certificates.
Domain Controller Certificate Profiles
Domain controller certificates must be issued with a set of specific extensions and values. The certificate profile for each domain controller must meet the following requirements:
-
The certificate Key Usage extension must contain:
Digital Signature, Key Encipherment -
The certificate Enhanced Key Usage extension must contain:
Client Authentication (1.3.6.1.5.5.7.3.2) Server Authentication (1.3.6.1.5.5.7.3.1) -
The certificate Subject Alternative Name extension must contain the Domain Name System (DNS) qualifier and fully qualified domain controller name. For example:
DNS Name=controller1.intranet.agency.gov -
The certificate Subject Alternative Name must also contain the domain controller’s Global Unique Identifier (GUID) (i.e., for the “domain controller object”).
- To determine the domain controller’s GUID, start Ldp.exe and locate the domain-naming context.
-
Double-click on the name of the domain controller whose GUID you want to view.
The list of attributes for the domain controller object contains “Object GUID” followed by a long number. The number is the object GUID. For example:
Other Name: 1.3.6.1.4.1.311.25.1 = ac 4b 29 06 bb d6 5d 4f e3 9c 4c ab c3 6a 55 d9The domain controller’s certificate must be installed in the domain controller’s local computer’s personal certificate store.
Issue Domain Controller Certificates
U.S. federal civilian agencies have a variety of information security policies. These policies cover whether you should use a domain controller certificate issued from your agency’s local enterprise certification authority (CA) or whether the certificate must be issued from a CA managed and certified under the Federal Public Key Infrastructure (FPKI). Each agency’s information security policy should be followed.
It is not recommended to set up a local enterprise CA just to issue domain controller certificates without ensuring the proper management and security protections are enabled. Your Chief Information Security Officer (CISO) must have awareness and oversight established for the CA management.
Collaborate with your CISO or Information Security Office for a definitive answer and direction.
If you do have a local enterprise CA, here are some tips.
Step 3 - Trust Stores
Follow Step 3 - Distribute to Operating System from the distribute FCPCA configuration guide.
Step 4 - Account Linking
Account linking refers to the process of associating a certificate on a user’s PIV credential with their domain account.
Comparing altSecurityIdentities and User Principal Name
There are two account linking attributes to choose from:
- altSecurityIdentities (recommended)
- User Principal Name (UPN)
It’s not possible to configure a domain to use both altSecurityIdentities and User Principal Name mapping. You must choose one of these options and configure its use for all domain users.
altSecurityIdentities Approach
- Each PIV credential can be associated with more than one account.
- This flexibility allows for the association of a single PIV credential certificate to an individual’s end-user and privileged user account(s).
- Users are presented with an additional field during network authentication to identify which account the user wants to access. This field is known as the User Name Hint.
- The User Name Hint informs Windows which account the user is trying to log in to if the mapped certificate is associated with multiple accounts.
- Entering a User Name Hint is optional if the user’s PIV Authentication certificate UPN matches their Windows logon name.
- You can choose from one of six options to map a certificate to a given account.
- There is more flexibility for accepting PIV credentials issued by other government agencies or partners, including PIV-Interoperable (PIV-I) credentials.
User Principal Name Approach
- Each PIV credential can only be associated with one account.
- The UPN value from the Subject Alternate Name in the PIV Authentication certificate is required.
- There is no flexibility for associating the PIV credential to separate privileged accounts.
- There is less flexibility for accepting PIV credentials issued by other government agencies or partners, including PIV-I credentials.
Transitioning from UPN Mapping to altSecurityIdentities Mapping
If you have a large network with many domains, you should carefully plan the migration from User Principal Name to the altSecurityIdentities account linking method.
Use of UPN by Applications
You may find that you have many applications that rely on User Principal Name values. There is no need to remove existing or stop populating new User Principal Name values in your transition to altSecurityIdentities.
There are three steps to implement altSecurityIdentities account linking:
Option 1. Link the PIV Authentication Certificate
First, you need to link each user’s PIV Authentication certificate to their domain account(s). This is accomplished by populating data extracted from the user’s PIV Authentication certificate into their Active Directory record, specifically into the altSecurityIdentities attribute.
Adding altSecurityIdentities attributes will not break existing UPN account linking or cause smart card logon to fail. It’s possible to plan your transition carefully and to take your time populating the altSecurityIdentities attribute for domain users.
There are six mapping options to choose from, but most organizations use Issuer and Subject.
| Options | Tag | Example | Considerations |
|---|---|---|---|
| Subject | X509:<S> | X509:<S>C=US,O=U.S. Government,OU=Government Agency,CN=JANE DOE OID.0.9.2342.19200300.100.1.1=25001003151020 | For certificates which assert the UID identifier (0.9.2342.19200300.100.1.1) or other object identifier in the common name, the identifier is prepended with the OID qualifier. |
| Issuer and Subject | X509:<I><S> | X509:<I>C=US,O=U.S. Government,OU=Certification Authorities,OU=Government Demonstration CA<S>C=US,O=U.S. Government,OU=Government Agency,CN=JANE DOE OID.0.9.2342.19200300.100.1.1=47001003151020 | Note the spaces carefully when testing machine-readable formats of the certificate extensions versus the human-readable formats. |
| Issuer and Serial Number | X509:<I><SR> | X509:<I>C=US,O=U.S. Government,OU=Certification Authorities,OU=Government Demonstration CA<SR>46a65d49 | Serial number is stored in a reversed byte order from the human-readable version, starting at the most significant byte. |
| Subject Key Identifier | X509:<SKI> | X509:<SKI>df2f4b04462a5aba81fec3a42e3b94beb8f2e087 | Not generally recommended; may be difficult to manage. |
| SHA1 hash of public key | X509:<SHA1-PUKEY> | X509:<SHA1-PUKEY>50bf88e67522ab8ce093ce51830ab0bcf8ba7824 | Not generally recommended; may be difficult to manage. |
| RFC822 name | X509:<RFC822> | Not recommended | Not recommended; not commonly populated in PIV Authentication certificates. |
Gathering PIV Authentication Certificates for Mapping into AD
Identity certificates used for Windows logon can generally be found:
- On the smart card itself.
- By requesting the certificates directly from the smart card issuer.
- By exporting the certificates from a third party application in which the certificates are already registered.
Each of these options is discussed below.
Gather Certificate from Smart Card
To gather the certificate from the smart card using a Windows workstation, have the cardholder do the following:
- Open the Start Menu, located in the bottom left corner of the screen.
- Type command prompt.
- In the prompt, type certutil -scinfo.

- Press Enter.
- The cardholder will be prompted several times for a PIN, but a PIN is not required for this operation. Have the cardholder press cancel each time they are prompted for a PIN until they see the Certificate List.

- Have the cardholder click Click here to view certificate properties. The appropriate certificate will list “Smart Card Logon” in the intended purposes on the General tab. If the certificate has this purpose listed, have the cardholder proceed to Step 7. Otherwise, have the cardholder close the certificate, click more choices on the Certificate List, click another certificate in the list, and click Click here to view certificate properties until the correct certificate has been identified.
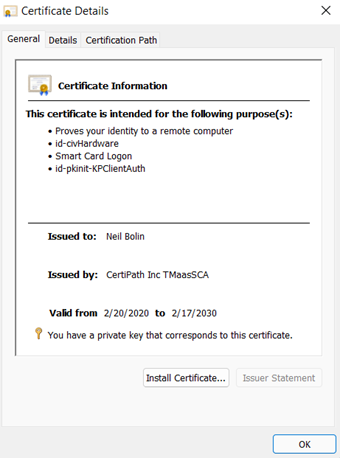
- Have the cardholder select the Details tab and then proceed with the steps below.
- Click copy to file to start the certificate export wizard.
- Click Next.
- Click Next again to indicate that the cardholder does not wish to export the private key.
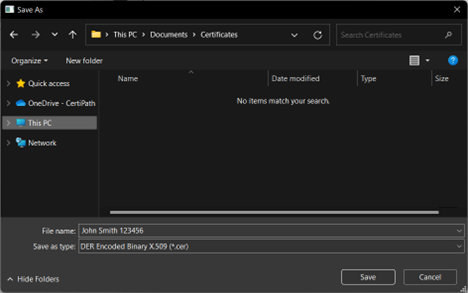
- Click Next again to use the default DER encoding.
- Click Browse to select where to save the certificate. Have the cardholder select a location that he or she has permission to save to, such as Desktop or Documents.
- Enter a meaningful name for the certificate (such as the cardholder’s name or employee ID).
- Click Save.
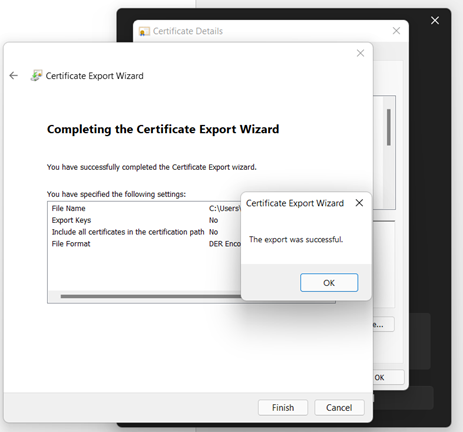
- Click Next.
- Click OK.
- Click OK to close the Certificate Details window.
- Click OK to close the Certificate List.
- Close the command prompt.
- Have the cardholder send the exported .cer file to your organization’s Network Administrator in a way that aligns with the organization’s security policies.
Request Certificates from the Smart Card Issuer
Your organization’s credential issuer may have a copy of certificates issued to current users. You will need to specifically request from the issuer the most recent valid identity certificates suitable for smart card logon. The issuer will produce these certificates in a variety of ways, based on the certification authority or the Card Management System in use.
Export Certificates from a Third Party System
Your organization may have already collected the relevant certificates as part of the enrollment process for a third party application, such as a FIPS 201-compliant PACS system. Depending on the system and configuration in use, you may be able to export your cardholders’ certificates from the database where they are enrolled. Speak with your PACS integrator to understand what options are available to you.

Methods for Linking the PIV Authentication Certificate
System administrators can leverage one of the approaches below to link PIV Authentication certificates with user accounts. Run these steps from a domain controller with elevated privileges.
A. Use the Active Directory Users and Computers Graphical User Interface
The following steps are useful if you only need to update a small number of user accounts:
- Start > Server Manager
- Tools > Active Directory Users and Computers
- View > Advanced Features
- Expand your domain to reveal the Users directory
- Right-click on the user whose certificate you’d like to map and select Name Mappings
- Click Add and browse to a local copy of the user’s PIV Authentication certificate
- Click Apply and then OK
B. Use Automation
If you are designing an automated process to transition users from Principal Name to altSecurityIdentities mapping, consider the following functionality:
- Load and process multiple certificates at once (for example, reading a directory of user certificates)
- Extract the UPN from each certificate and ensure a corresponding user record exists in Active Directory
- For certificates that contain a UPN that matches a record in Active Directory:
- Extract and format the certificate Issuer and Subject attributes in preparation for publishing to Active Directory
- Update the user’s Active Directory record with the altSecurityIdentities attribute and corresponding Issuer and Subject data
- For certificates that do not contain a UPN that matches a record in Active Directory:
- Set aside for manual review (e.g., these users may be no longer affiliated with your organization)
- Evaluate accounts in Active Directory that do not contain an altSecurityIdentities attribute after process execution for manual review and further remediation
Collaborate with us!
We're working with a small number of agencies to pilot a simple PowerShell script to help with some of the functional requirements above. Check out the script in our public scripts repository or contact ICAM at GSA.Gov for more information.
Option 2. Enable User Name Hints
You need to enable User Name Hints for your network domain. This will modify the logon prompts for Windows workstations and servers joined to the network domain. Your users will be prompted to provide both the PIV credential PIN value and a User Name Hint value.
For Windows Server 2012 and later:
- Computer Configuration > Administrative Templates > Windows Components, and then expand Smart Card.
- Select Allow User Name Hint
Management of smart card settings should be deployed using a group policy object for the domain.
Option 3. Disable User Principal Name Mapping
To transition from UPN mapping to altSecurityIdentities account linking, you will need to configure a registry setting on all domain controllers. Only configure the registry setting below once you have completed the above steps and are ready to disable UPN mapping.
Note: Organizations should carefully plan their transition to the altSecurityIdentities account linking approach and test interoperability before implementing changes in their production IT environments. The registry configuration below will cause smart card logon to fail for any user missing the altSecurityIdentities attribute.
- Key: HKEY_LOCAL_MACHINE\SYSTEM\CurrentControlSet\Services\Kdc
- Name: UseSubjectAltName
- Type: DWORD
- Data (Value): 00000000
This setting tells your network domain I don’t always want to use the Subject Alternate Name values for my user certificates. More information on the setting is available here.
It’s possible to revert to UPN account linking by removing the registry setting above.
Use group policy objects or other centralized management options to manage registry options.
Step 5 - Group Policies and Enforcement
The U.S. federal government publishes the United States Government Configuration Baseline (USGCB) for use by Executive Branch agencies to promote uniform configurations for commonly used operating systems. The USGCB configuration guidelines for specific operating systems include references to some configurations related to smart card (PIV) logon and should be referenced first.
The information on this page is intended to answer questions and identify the most commonly used configuration options. For a full reference of options for each operating system, please refer to configuration guides published by other sources online.
Machine Based Enforcement Versus User Based Enforcement
There are two options for requiring users to use PIV credentials to authenticate to the network domain:
- Machine Based Enforcement (MBE)
- User Based Enforcement (UBE)
These options are controlled by group policy applied to either Machine or User objects in your network domain. Planning is required to move to full User Based Enforcement and agencies are often using a combination of both Machine and User enforcement in their deployments.
User Based Enforcement
The user’s password will no longer be known by the user. Look for agency internal applications that are still using username and password and performing Form Based Authentication against the network directories. Fix these using Kerberos, SAML, or direct x509 authentication.
Impacts and considerations are identified to help you plan and execute according to your agency network and user needs.
| Type | Impacts | Considerations |
|---|---|---|
| Machine Based Enforcement | The user is required to use their PIV credential to authenticate to each device where the policy is applied. | The user password is maintained. |
| User Based Enforcement | The password stored for the user is removed and changed to a long hash value unknown to the user. Your users no longer have passwords for the network. | Any applications which were implemented to prompt your users for a username and password and which are using your network domain directories will no longer be accessible. |
Your applications impacted by User Based Enforcement are designed or deployed using:
- Form Based or Basic Authentication
- or LDAP simple binds
The user will be presented with the application form to enter a username and password and the user will no longer have the password.
You want to analyze your applications and identify which are configured to use your users’ network domain passwords. There are methods to fix the applications by enabling Kerberos, SPNEGO (web applications), direct x509 authentication (client certificate authentication), or the SAML and Open ID Connect (OIDC) protocols. These topics will be covered in the Applications section of the guides that are in-development and we invite all to contribute to them!
Defining the Policies for Machine Based Enforcement or User Based Enforcement
The setting to enforce PIV logon is controlled by scforceoption in your network domain user and workstation policies.
- Machine Based Enforcement is when you apply the scforceoption to a workstation or server object in your network domain.
- User Based Enforcement is when you apply the scforceoption to a user in your network domain.
This is the only difference when implementing the policy: which objects in your domain you apply the policy to.
You can set the policy option on a single user by checking the Smart Card is required for interactive logon check box in the user account properties. You can also apply this setting using group policy objects. When the scforceoption setting is applied, the SMARTCARD_REQUIRED flag is added to the UserAccountControl (UAC) and the DONT_EXPIRE_PASSWORD attribute is set to true.
Defining Kerberos Policies for Re-authentication
Although users can PIV authenticate to domain controllers, the client and the domain controller maintain those sessions using kerberos tickets.
Group policies can be configured by domain administrators to align with local security policies for maximum lifetimes of kerberos user tickets. This may cause users to be prompted to re-authenticate with their PIV when prompted with one of the following options:
- Windows Needs Your Current Credentials
- Please Lock this computer, then unlock it using your most recent password or smart card
These prompts happen when the kerberos ticket lifetime expires and a new authentication event is required. User is set to user based enforcement, which requires a new PKINIT event with the domain controller.
You can find additional information on configuring kerberos policies given the following reference documentation.
Step 6 - Network Tuning
You can tune the network domain settings to help you and your users have a better experience and reduce errors. This section highlights some of the common tuning configurations for network domain logon. There are additional tuning configurations and we encourage you to start with these first and contribute others.
You can also send questions to the ICAM Technology listserve (email to ICAM-COMMUNITY-TECH at listserv.gsa.gov) to ask your government colleagues for their additional tips and tricks!
Cached Logon Credential Limit
When a user authenticates to a Windows system, their logon credentials are cached to enable logon in the event the domain controller is unavailable. The United States Government Configuration Baseline (USGCB) for Windows 7 specifies that Interactive logon: Number of previous logons to cache (in case domain controller is not available) should be set to 2.
There are no required USGCB settings for Windows 8 or Windows 10.
You should configure the cached logon credential limit to be at least “2” and possibly more depending on the mission needs.
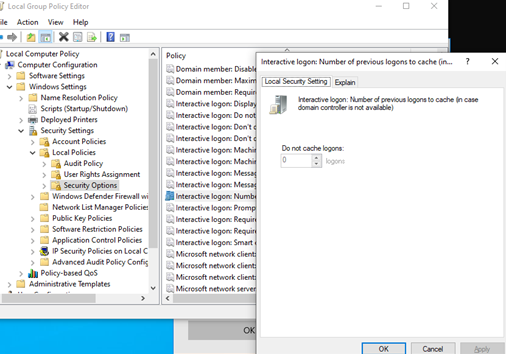
The Number of previous logons to cache can be modified in local or group policy in the following location Computer Configuration\Windows Settings\Security Settings\Local Policies\Security options
More information is available on Microsoft TechNet
CRL Retrieval Timeout Settings
By default, Windows will time out when downloading Certificate Revocation List(s) after 15 seconds. A number of CRLs in the government environment are large, greater than 20 MB in size, which will lead to the timeout happening. This example scenario can be common and a source of frustration to you and your users:
- The first or the 51st user will attempt to log on in the morning in a region
- The validity period and cache of the previous CRL will have expired on the domain controller
- The domain controller will attempt to download the large CRL file and will hit the timeout limit
- The user will receive an authentication failure (unable to log on)
- The user will be able to try again and be successful
- You will try to determine the root cause to diagnose the failures (i.e., chasing ghosts on the network)
- This process will repeat
You want to tune both the OCSP Response Caching Behavior setting and the CRL Retrieval Timeout Settings.
The default timeout value can be modified using local or group policy by modifying the Default URL retrieval timeout value found in the Certificate Path Validation Settings, Network Retrieval tab, located in Computer Configuration\Windows Settings\Security Settings\Public Key Policies
Consult these step-by-step instructions: Manage Network Retrieval and Path Validation
OCSP Response Caching Behavior
By default, Microsoft Windows will retrieve and cache 50 OCSP Responses for any one issuing CA before switching to CRL mode. Depending on the size of the CRL, this may be a poor performance decision. For environments where workstations routinely interact with large CRLs, a large value may significantly reduce network bandwidth consumption. This value can be increased by setting the CryptnetCachedOcspSwitchToCrlCount DWORD value in the following registry key: HKEY_LOCAL_MACHINE\Software\Policies\Microsoft\SystemCertificates\ChainEngine\Config
Source: Optimizing the Revocation Experience
Step 7 - Local Certification Authority
This page provides some tips for using a local certification authority (CA) to issue a domain controller certificate. This is for local Microsoft CAs. Other platforms may be used and have different procedures.
These procedures are accurate for using Microsoft 2012 Server, Standard Edition, for CA and domain controller servers as of March 2017.
Can federally operated certificate revocation services (CRL, OCSP) operate on port 80?
Yes. This very narrow class of services, that provide CRL and OCSP information for the purposes of verifying the revocation status of certificates used to make other HTTPS connections, should abide by best practices in the field and their respective specifications. For CRLs, follow RFC 5280 which states CAs SHOULD NOT include URIs that specify https, ldaps, or similar schemes in extensions. For OCSP, follow RFC 6960 which states a CA may use port 443 for OCSP where privacy is a requirement. Agencies are encouraged to operate OCSP and CRL services via hostnames specifically reserved for those services, so that other related information and functionality can be served securely and privately. For more information see the Federal CIO Council HTTPS-Only Standard .
Prerequisites
- The server that hosts the CA must be joined to the domain.
- The CA should never reside on the same server(s) that are acting as domain controller(s).
- You must be an Enterprise Administrator in the domain to perform these steps.
Install CA Role
- Log into the CA server as a member of the Enterprise Administrators group.
- Open the Server Manager and click on Manage > Add Roles and Features.
- Proceed through the Add Roles and Features Wizard options. Choose the following:
Server Roles: Active Directory Certificate Services
AD CS Roles Services: Certification Authority - On the Results page, click on Configure Active Directory Certificate Services on the destination server.
- Proceed through the AD CS Configuration options. Choose the following values, as required:
Role Service: Certification Authority
Setup Type: Enterprise CA
CA Type: Root CA
Private Key: Create a new private key
Cryptography: RSA#Microsoft Software Key Storage Provider, 2048 bit, SHA-256 6e
CA Name: Use the naming convention: dc=[AD suffix], dc=[AD domain], cn=[certification authority name]
(e.g., dc=gov, dc=[AgencyName], cn=[AgencyName] NPE CA1)
Validity Period: 6 years
Certificate Database: <your preference>
Configure Certificate Template for Domain Controller
The domain controller(s) certificate must contain valid information. These steps provide recommended options and settings.
- Log into the CA server as a member of the Enterprise Administrators group.
- Open the certificate template’s MMC snap-in (i.e., certtmpl.msc).
- Right-click on the Domain Controller Authentication template. Then, click on Duplicate Template.
- Under the Compatibility tab, modify the Compatibility Settings for both the CA and certificate recipients to the highest compatible version (e.g., Windows Server 2012 R2 or Windows 2008 R2).
- Under the General tab, use these recommended settings:
Template Name: <Your organization> - Domain Controller Authentication.
Validity Period: 3 years.
Renewal Period: 6 weeks. - Under the Cryptography tab, set these values:
Minimum Key Size: 2048.
Request Hash: SHA256 - Open the CA console (i.e., certsrv.msc).
- In the console tree, click on the [CA’s name].
- In the details pane, double-click on Certificate Templates.
- In the console tree, right-click on Certificate Templates. Then, click on New > Certificate Template To Issue.
- Select and enable the certificate template that was created. Click on OK.
Auto-Enroll Domain Controllers Using Group Policy Object (GPO)
- Log into a Domain Controller server as a member of the Enterprise Administrators group.
- Open the GPMC: gpmc.msc
- Within the appropriate GPO applied to the Domain Controllers, go to Computer Configuration\Policies\Windows Settings\Security Settings\Public Key Policies\
- Configure Certificate Services Client – Auto-Enrollment with the following options:
Configuration Model: Enabled.
Renew Expired Certificates, Update Pending Certificates, Remove Revoked Certificates: Check_all checkboxes.
Update Certificates That Use Certificate Templates: Check the checkbox. - Replicate the group policy. Use the command: gpupdate /force at the command line, or wait for the group policy to replicate based on your replication time and settings.
- Open MMC.exe -> File -> Add/Remove Snap-in -> Certificates -> Computer account -> Local computer.
If successful, you will see a new domain controller certificate in the Certificate (Local Computer) -> Personal -> Certificates folder. At the Certificate Template tab, you will also see a certificate generated with the custom certificate template.
Step 8 - Authentication Assurance
When a user authenticates to your network and you’ve enabled Single Sign-on to applications inside your network domain, you need to know which of these authenticators was used:
- A username and password
- A PIV credential
- An alternate authenticator
You need to know the type of authenticator to implement increasingly granular authorization policies and to grant or deny a user access to information available from applications and shared network resources.
To grant a user access, based on the type of authenticator used, you can use a Windows Active Directory (AD) feature called Authentication Mechanism Assurance (AMA). AMA allows you to add a group membership identifier to the user’s Kerberos token.
Do not uses AMA to provide privileged access
Privileged users should not rely on single sign-on and should always use the highest assurance credential. Their account should be separate and distinct from their normal user account. See the <a class="usa-link" href="/playbooks/pam/" target="_blank" rel="noopener noreferrer"}>Privileged Identity Playbook</a> for best practices in reducing risk associated with privileged accounts and access.
AMA is available for Windows Server 2008 R2 domains and later versions.
Implementation
You can use this PowerShell script CertificateIssuanceOIDs.ps1 to import and set up a list of certificate issuance policies. This script:
- Contains a list of certificate issuance policy object identifiers (OIDs) used by U.S. federal government agencies
- Creates security groups with the same names as the policies
- Links the policies to the security groups
You can run the script with a few simple steps.
-
You’ll need to specify the Group Distinguished Name (GroupDN) within the script. This targets where you want to create the security groups in your network directory:
CertificateIssuanceOIDs.ps1 -GroupDN \<group DN string>- For example:
CertificateIssuanceOIDs.ps1 -GroupDN 'OU=Groups,OU=Administrators,DC=agency,DC=gov'
-
After downloading this script, you may need to change the PowerShell script execution policy to execute the script or sign the script to execute it.
A sample output from the script is shown below:
  PS C:\> C:\AMA\Script\CertificateIssuanceOIDs.ps1
  -GroupDN 'ou=groups,ou=security,dc=agency,dc=gov'

  Created CN=id-fpki-common-authentication,ou=groups,
  ou=security,dc=agency,dc=gov
  2.16.840.1.101.3.2.1.3.13 -- Unknown ObjectId

  Localized name added to DS store.
  0: 1033,id-fpki-common-authentication
  CertUtil: -oid command completed successfully.

  Created CN=13.255922318A2AF32EC47D5B70735D4DB3,
  CN=OID,CN=Public Key Services,CN=Services,
  CN=Configuration,DC=agency,DC=gov
  AD AMA set for 2.16.840.1.101.3.2.1.3.13  id-fpki-common-authentication
Note: If the GroupDN is not entered in the command line when executing the script, it will prompt for the input.
  PS C:\> C:\AMA\Script\CertificateIssuanceOIDs.ps1
  cmdlet ama-script.ps1 at command pipeline position 1
  Supply values for the following parameters:
  GroupDN: ou=groups,ou=security,dc=agency,dc=gov
==============================================
  GroupDN entered is ou=groups,ou=security,dc=agency,dc=gov
Testing
To test the output on your network domain, log in with your PIV credential and check the groups assigned.
- Authenticate with your PIV credential
- From the command line:
C:\whoami /groups
  agency\id-fpki-common-authentication   Group  S-1-5-21-179144328
  1-1764752353-2202401552-1113
  Mandatory group, Enabled by default, Enabled group
Use Case Scenarios
Authentication Pass-Through to a Federation Service
A federal employee authenticates to the agency’s intranet using a PIV credential and attempts to access an application hosted by a different federal agency.
- The application is restricted to allow access only for users who have authenticated with a valid PIV Authentication certificate.
- All other users are denied access to the application.
This federal employee successfully accesses the other federal agency’s application with minimal inputs. The employee is successful because:
- The employee’s home agency has a Federation Service installed, and
- The employee’s home agency has integrated with the other agency’s Federation Service
During and after the employee’s logon to the network, the following steps were executed without the employee’s intervention:
- The PIV authentication certificate is parsed
- The certificate policy OID asserted allows Microsoft AD on the home agency’s network to assign the user to a group specifically for PIV authenticated users
- The user’s session is granted a Kerberos ticket that includes the additional group membership
- The user browses to the other federal agency’s application
- The user’s browser is redirected to his/her home agency’s Federation Service
- The Federation Service at the home agency finds the Kerberos ticket for the user’s session
- A Security Assertion Markup Language (SAML) assertion is created by the Federation Service (This is a token translation.)
- The SAML assertion includes the AD group membership information that identifies that this user authenticated with a PIV credential
- The user’s browser is redirected back to the other federal agency’s application
- The user is successfully authenticated with the valid SAML assertion
- The other federal agency’s application is configured to allow access to only those users who have authenticated using a PIV credential
In this use case and steps, the user did not have to authenticate directly with a PIV credential to the other agency’s application. A federation model was used.
One example for viewing this implementation pattern is Max.gov. If you click the upper left-hand Login button, you’ll see the Max.gov Login page. The bottom section allows you to select an agency. Each of these icons redirects the user back to that agency’s Federation Service.
Authentication Pass-Through for Integrated Windows Authentication
A federal employee authenticates to his/her agency’s intranet using a PIV credential and attempts to access a local SharePoint site.
- The SharePoint site is restricted to allow access only for those users who have authenticated with a PIV Authentication certificate.
- All other users are denied access to the SharePoint site.
The federal employee successfully accesses the local SharePoint site.
During and after the employee’s logon to the network and attempt to access the SharePoint site, the following steps were executed without the employee’s intervention:
- The PIV authentication certificate is parsed
- The certificate policy OID asserted allows Microsoft AD on the home agency’s network to assign the user to a group specifically for PIV authenticated users
- The user’s session is granted a Kerberos ticket that includes the additional group membership
- The SharePoint site is configured to only allow access to only those users who have authenticated using a PIV credential
Other Considerations and References
Use the Windows Registry Editor to set the AMA Priority above Most Recently Issued Superior Certificate Heuristic:
[HKEY_LOCAL_MACHINE\SYSTEM\CurrentControlSet\services\kdc]"ChainWithIssuancePolicyOIDs"=dword:00000001
Refer to the AMA Step-by-Step Guide to understand the implementation of AMA.
Troubleshooting PIV Logon
Within the federal enterprise, Windows smart card logon with a PIV card (PIV logon) is one method to satisfy Federal Information Security Management Act (FISMA) and National Institute of Standards and Technology (NIST) Risk Management Framework security controls for authentication. A PIV card enables Authenticator Assurance Level 3, two-factor authentication to a Windows desktop. Under normal conditions, this system is simple and easy for an end user to use. However, if this logon mechanism breaks, it can be difficult to troubleshoot logon and authentication errors. This page includes common symptoms and suggested steps to diagnose and solve these issues.
Logon Process Overview
The figure below, from the “Smart card sign-in flow in Windows” section of the Microsoft Certificate Requirements and Enumeration article, provides a detailed overview of how smart card logon works in supported versions of Windows.
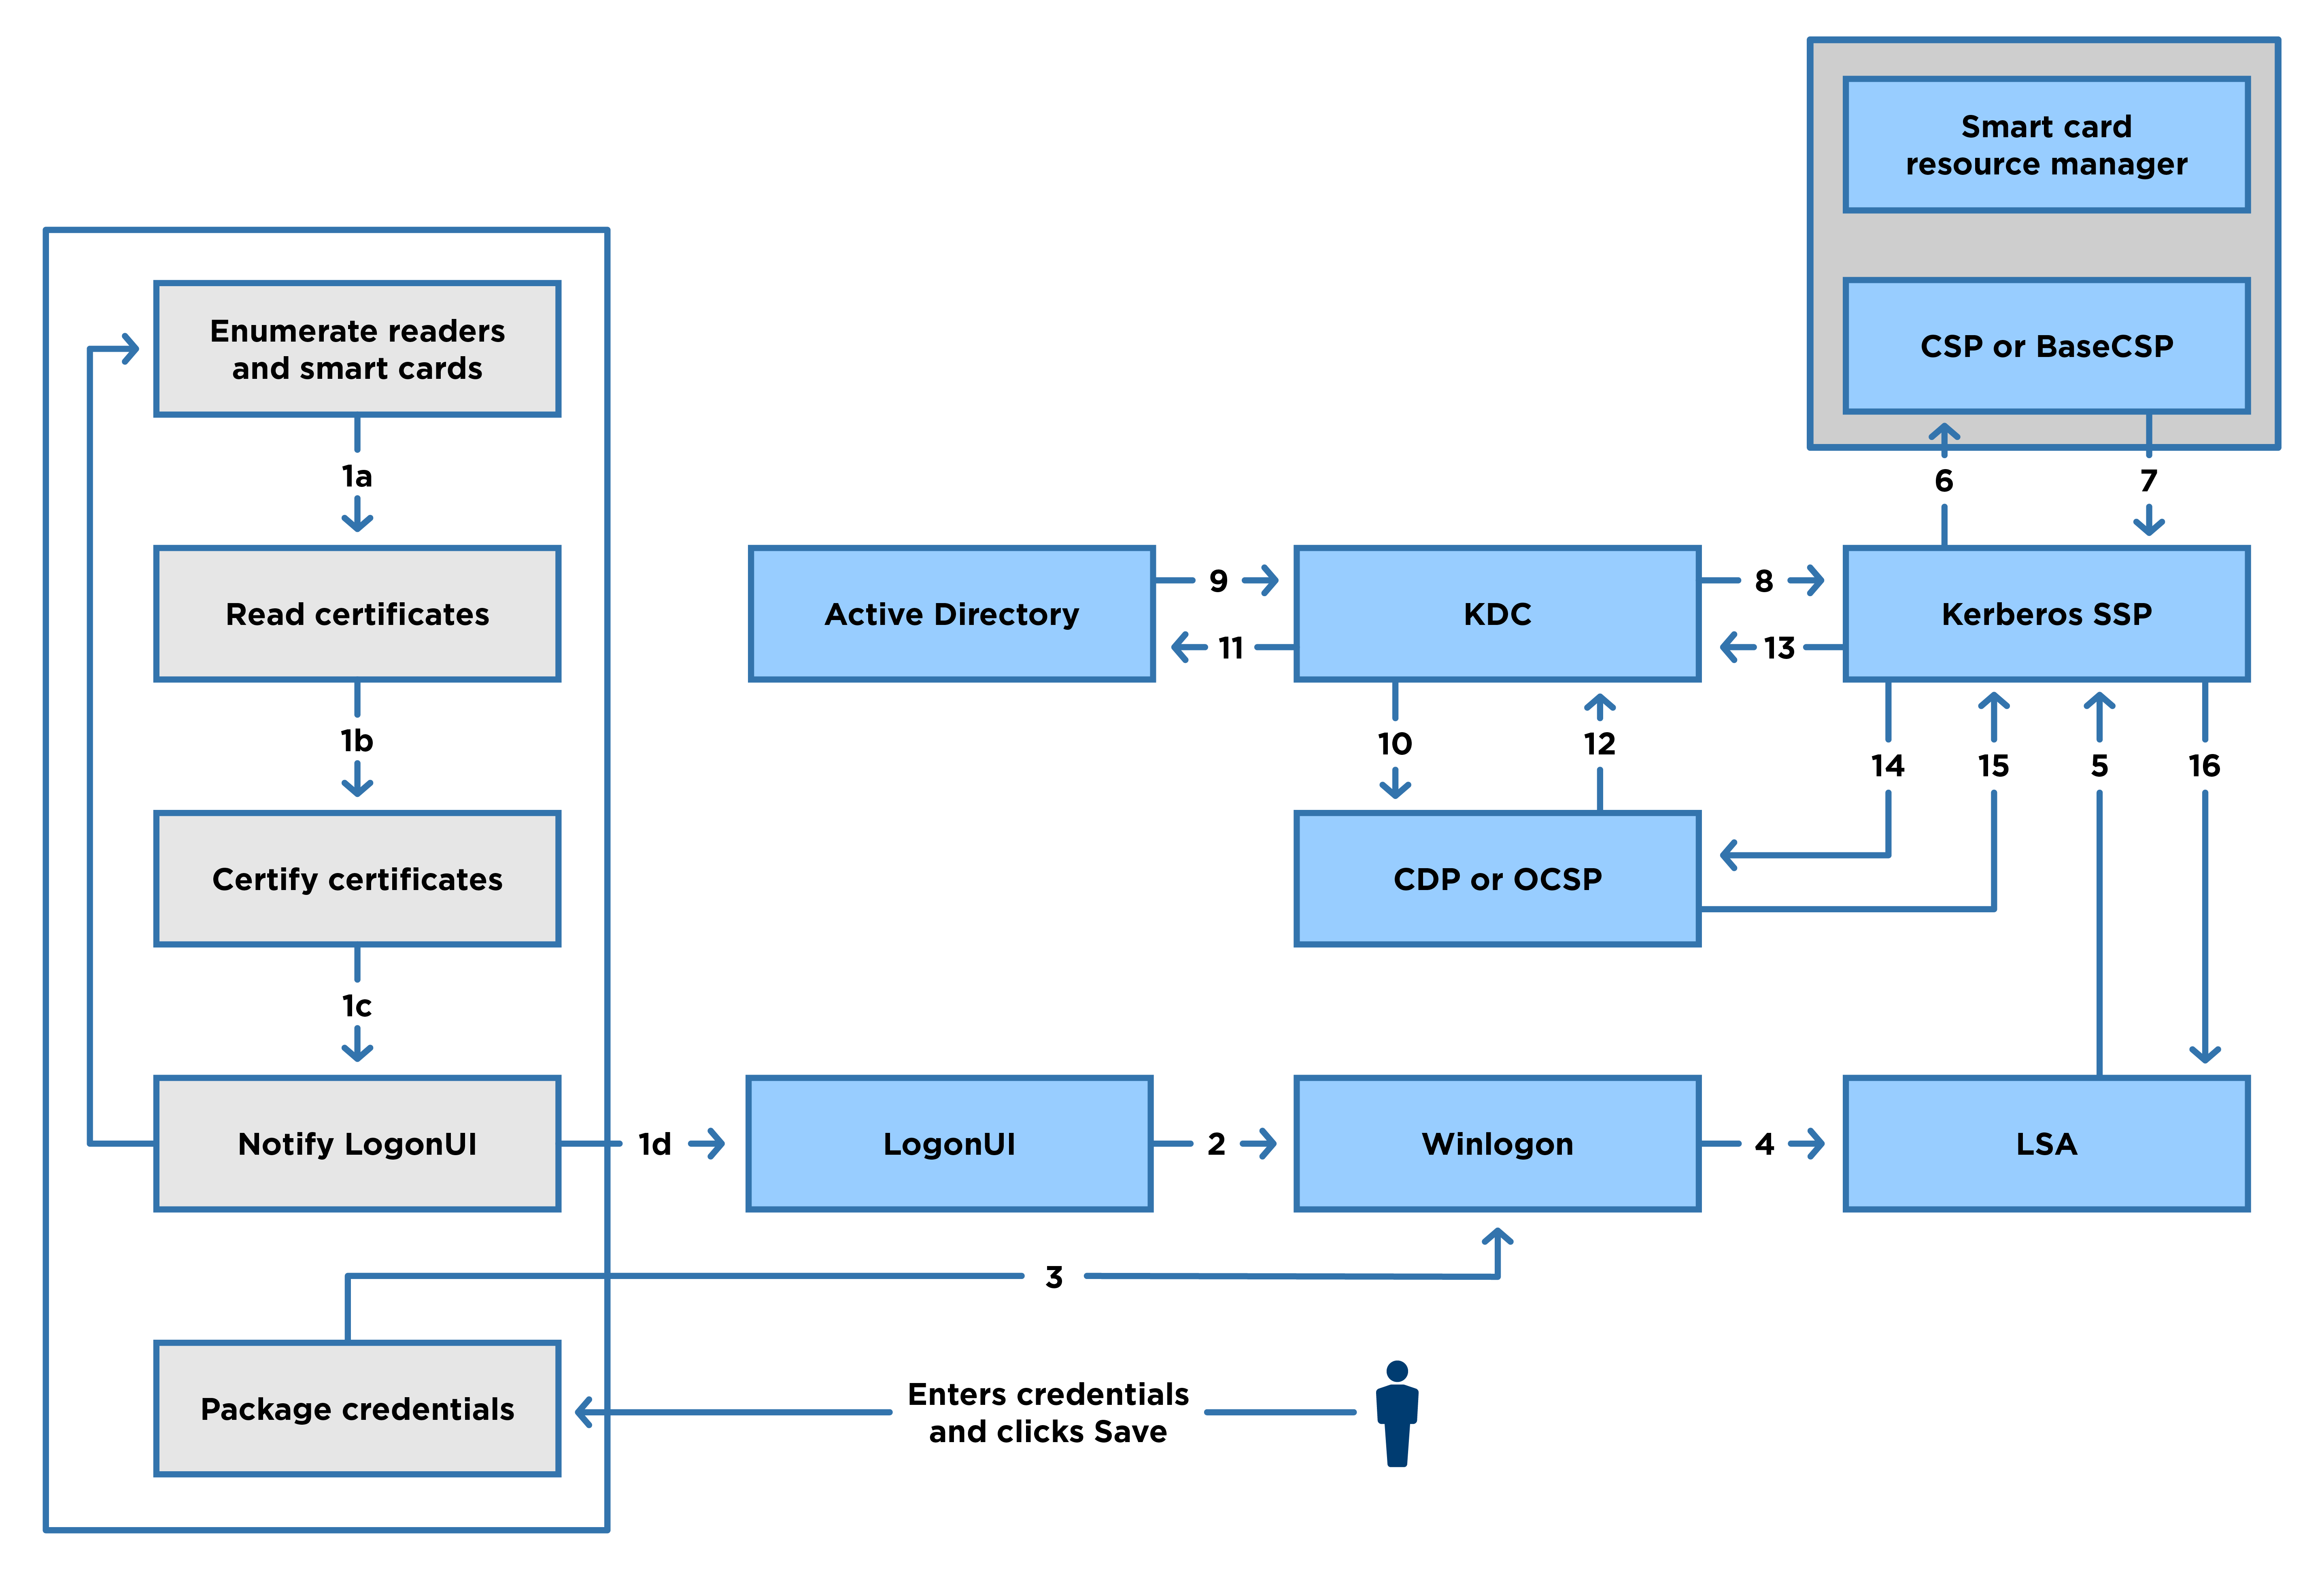
For our use, this complex process is simplified into the following workflows:
PIV logon begins at the client workstation. First, the system discovers smart card reader devices that are built into or attached to the workstation. Next, acceptable smart card logon certificates from any connected cards are provided to the Windows logon screen. In general, PIV cards are engineered to have one authenticate certificate marked eligible for smart card logon. However, in some instances, more than one certificate may have been inadvertently made eligible, meaning the user may first be asked to select the correct certificate for smart card logon. Conversely, the user may have a Facility Access Card (FAC) that omits access to any workstation. For more details on what is in use at your organization, speak with your agency’s credential issuer or Identity, Credential, and Access Management (ICAM) office.

Back to Process Overview
When the logon screen appears, if the system has detected a smart card reader and an attached (inserted) smart card with suitable certificates, the smart card logon option is displayed and the user is prompted to enter a PIN. Use the information below to troubleshoot symptoms encountered with card selection before PIN entry.
Symptom
Smart card icon is not displayed; user is not prompted for PIN.
Possible Cause 1 - Reader or Card Not Detected
Windows does not detect either the reader or the card due to a software or hardware issue with the card reader.
Diagnosis
- Ask the user to make sure that the PIV card is fully inserted in the reader.
- If the smart card reader is an external USB device, ask the user to remove the device and try inserting it into a different USB port.
- Ask the user to try rebooting their workstation.
- Ask the user to try using their PIV with their PIN elsewhere.
- If the issue persists through reboot, and the PIV with PIN works elsewhere, the smart card reader may need to be replaced or the workstation may need to be serviced.
Resolution
Replace the smart card reader if it is an external device. Otherwise, schedule workstation repair.
Possible Cause 2 - Card Damaged
The PIV is damaged.
Diagnosis
If faulty workstation hardware or software is ruled out, and the card does not work on other readers, the PIV may need to be replaced.
To confirm that the card is functional, you can use the Certutil Tool, listed on the Useful Tools page, on a known working Windows workstation.
On the client:
- Log in to Windows using a password.
- Open the Start Menu, located in the bottom left corner of the screen.
- Type cmd.
- Click Command Prompt, shown under Best Match.
- In the command prompt, type certutil -scinfo and press Enter.
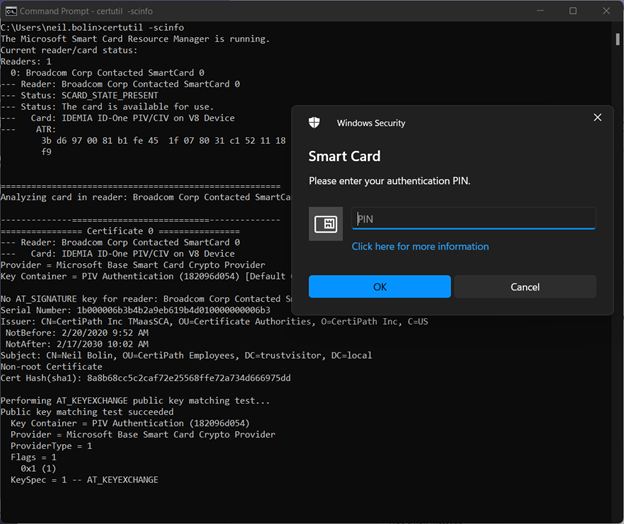
- A functioning card will return information on the card type and reader, begin polling for keys and validating certificates, and prompt for PIN entry. If this is the case with the card you are testing, click Cancel and close out of the command prompt.
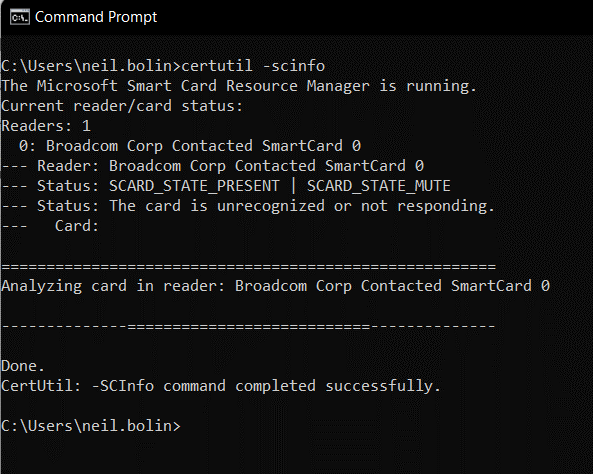
- If the card is malfunctioning, certutil will recognize that a reader is connected and a card is present but will display an error and will not prompt for PIN entry.

Resolution
Replace the PIV card if necessary.
Back to Process Overview
After the user enters their PIN, Windows tries to unlock the card using the PIN entered. After the card has been unlocked, the workstation packages the user’s PIV authentication certificate and sends it to the logon server, also known as a domain controller. The workstation must be able to trust the domain controller so that the workstation can securely connect to it. Use the information below to troubleshoot symptoms encountered after the PIN is entered but before logon occurs.
Symptom
After PIN entry, the following error is displayed on the logon screen:
Signing in with a smart card isn’t supported for your account. For more information, contact your administrator.

Possible Cause - Domain Controller Certificate
A suitable domain controller authentication certificate is not installed on the domain controller.
Diagnosis
On the client:
- Log in to Windows using a password.
- Open the Start Menu, located in the bottom left corner of the screen.
- Type event viewer.
- Click Event Viewer, shown under Best Match.
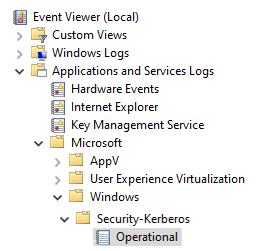
- On the left side of the Event View, expand Applications and Services Logs, Microsoft, Windows, and Security-Kerberos on the tree.
- Click Operational.
- On the right side of the window, under Actions, click Enable Log (skip this step if the option reads ”Disable Log”; the log is already enabled).
- Log out of Windows.
- Try having the user log in to their workstation again using their PIV.
- Log in to Windows using a password.
- Repeat Steps 2 through 6 to return to the Security-Kerberos log in Event Viewer.
- Click in the center of the window where ”Error” is shown. The following log will appear.

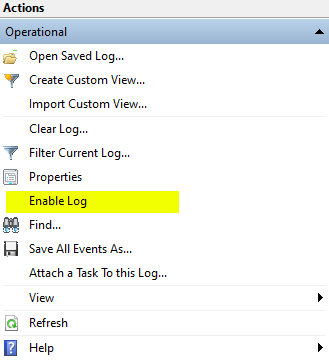
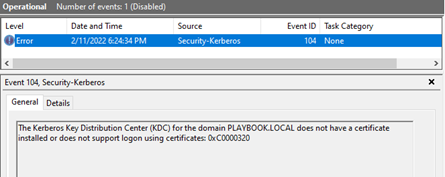
Resolution
On the domain controller:
- Log in as a Domain Administrator.
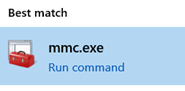
- Open the Start Menu.
- Type mmc.exe.
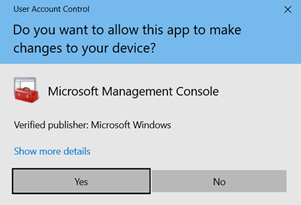
- Click MMC, shown under Best Match.
- If prompted by a User Account Control pop-up, click Yes.
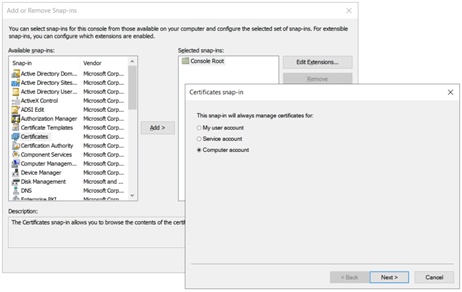
- Click the MMC window and press and hold Ctrl. Then press M and release both keys.
- In the Add or Remove Snap-ins window, click the following:
- From the Available Snap-ins on the left, click Certificates.
- In the center of the window, click the Add button.
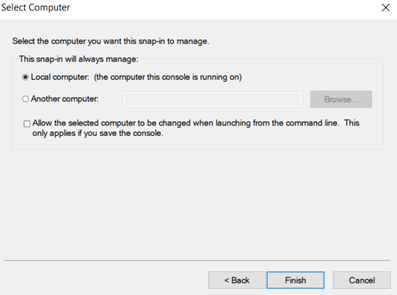
- In the Certificates snap-in window, click Computer account. Then click Next.
- In the Select Computer window, click Finish.
- In the Add or Remove Snap-ins window, click OK.
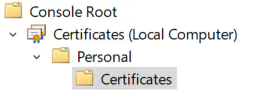
- On the left side of the MMC window, click the > symbol to expand these items on the tree:
- Certificates (Local Computer)
- Personal
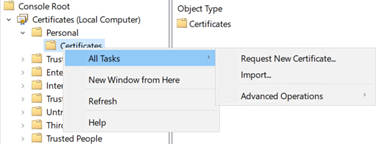
- Under Personal, right-click Certificates.
- Click All Tasks.
- Click Request New Certificate.
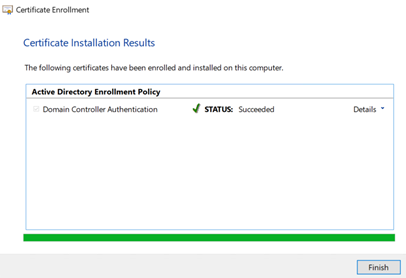
- In the Certificate Enrollment window, click Next.
- Click Next.
- Click the box next to the Domain Controller Authentication template. If you do not see this, ask your CA Administrator to publish this template.
- Click Enroll.
- Click Finish.

Back to Process Overview
After the domain controller’s authentication certificate is used to make a secure link from the workstation to the domain controller, the certificate data for the user’s smart card is sent to the domain controller for validation. The domain controller does the following to validate the credential:
- The domain controller looks up the user’s account in Active Directory (AD) using information found in the user’s PIV authentication certificate. This process is known as name mapping. More information about user name mapping can be found in the Account Linking Playbook
- The certificate is sent to the Microsoft Crypto-API (CAPI) service running on the domain controller for path discovery and validation. CAPI performs basic certificate checks through Path Discovery and Validation (PDVal).
- The domain controller checks its local copy of the Enterprise NTAUTH store for the presence of the issuing certification authority (CA) for the PIV authentication certificate. Steps for adding a certificate to this store can be found in the Trust Stores Playbook
Note: Certificate validation of the PIV authentication certificate for smart card logon only occurs on the individual domain controller processing the logon request. The client computer does not check the validity of the logon certificate. Other applications outside of Windows logon may perform certificate validation locally, so it may still be a good idea to have a valid path installed on your organization’s client computers. if you have multiple logon servers in your environment, only the one responding to the individual logon request performs validation. Therefore, it is important to maintain a consistent configuration across your domain controllers.
Use the information below to troubleshoot additional symptoms encountered after the PIN is entered, but before logon occurs.
Symptom
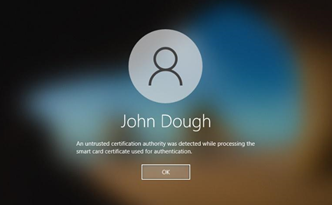
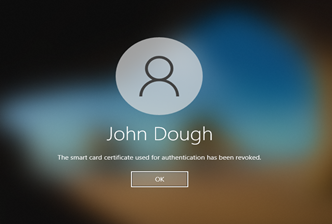
After PIN entry, one of the following errors displays on the logon screen:
- An untrusted certification authority was detected while processing the smart card certificate used for authentication.
- The smart card used for authentication has been revoked.
- In some environments, under some circumstances, distribution of the root by GPO can sometimes cause PIV certificates to appear to be untrusted intermittently. Microsoft has published a description of the issue and identified a workaround. </p> </div> </div>
Possible Cause 1 - Certificate Fails Path Discovery and Validation
The user’s PIV authentication certificate fails path discovery and validation on the domain controller.
Diagnosis
On the client:
- Log in to Windows using a password.
- Open the Start Menu, located in the bottom left corner of the screen.
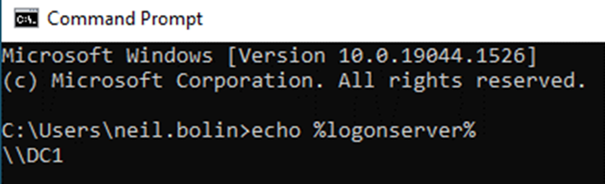
- Type cmd.
- Click Command Prompt, shown under Best Match.
- In the command prompt, type echo %logonserver% and press Enter.
- The current domain controller being used for Windows logon is displayed. This is the best domain controller to check first for troubleshooting invalid smart card logon events.
On the domain controller indicated above:
- Log in as a Domain Administrator.
- Open the Start Menu.
- Type mmc.exe.
- Log in to Windows using a password.
- Open the Start Menu, located in the bottom left corner of the screen.
- Type event viewer.
- Click Event Viewer, shown under Best Match.
- On the left side of the Event View, click the > symbol to expand each of these items on the tree:
- Applications and Services Logs
- Microsoft
- Windows
- CAPI2
- Click Operational.
- On the right side of the window, under Actions, click Enable Log (skip this step if the option reads ”Disable Log”; the log is already enabled).
- Log out of Windows on the client workstation.
- Have the user try to log in using their PIV, taking note of the time. The error should be shown on the logon screen.
- On the domain controller, still in Event Viewer, on the right pane, click Refresh.
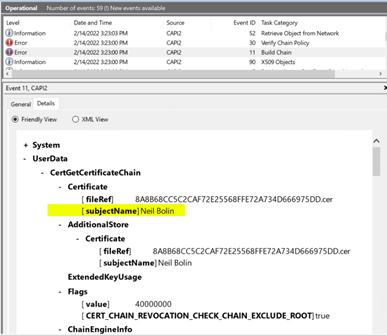
- New log events will be shown. Look for the events with an “Error” status and the task category “Build Chain.”
- Click the Details tab. In the UserData section, look for the user’s name in the Certificate [subjectName] field. If you do not see the user’s name, continue scrolling through the list of events to find the next event with an “Error” status and the task category “Build Chain.” Using results filtering may help to narrow this list down.
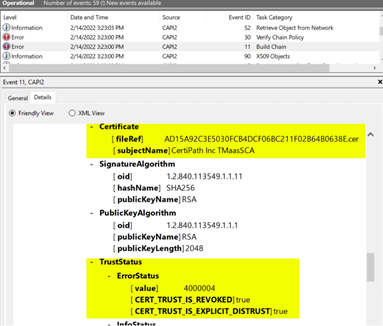
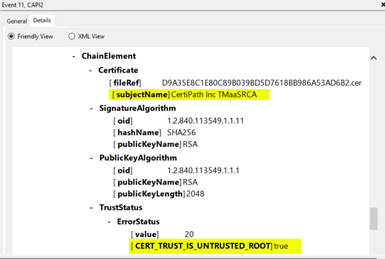
- Once you find the event, scroll down through the details. You will see sections that say “-ChainElement.” These indicate each of the certificates in the path that was built. Within each chain element, look again for the ”- Certificate [ subjectName ],” indicating which certificate is being checked, and below it, a ”- TrustStatus” with an ”- Error Status” which will give more details about the failing validation.
Example 1: A certificate in the path is revoked.
Example 2: The path does not build to a trust anchor
Example 3: The revocation status is unreachable, or the revocation status signature cannot be validated due to an invalid trust path.
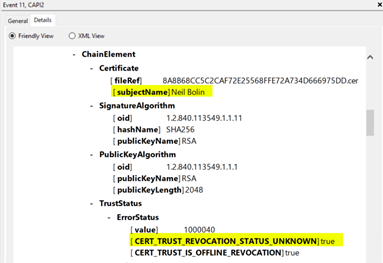
Note: The error status in Example 3 will occur for any certificate lower in the path than the above Examples for 1 and 2. For example, if a trusted root cannot be found at the top of the path, no valid revocation status will be found for any certificate issued below the trusted root, including the issuing CA certificate and the end user’s PIV authentication certificate. This situation occurs because the revocation data cannot have its signature verified for the same reasons that the certificate itself cannot.
You can also use the PKI Interoperability Test Tool (PITT), listed on the Useful Tools page, to validate the certificate path on the logon server. The PITT Usage Guide contains procedures for using the tool.
Resolution
- On the domain controller, work through any path validation issues identified in the above steps and examples. Keep in mind that that path building comes before validation and that a path is built from the bottom up. In this instance, the PIV authentication certificate chains to a trust anchor, such as Federal Common Policy G2. Ensure that the correct trust anchor for your organization’s PIV credentials is installed on every domain controller. If you also trust certificates from other agencies and organizations, the appropriate roots and cross-certificates may need to be installed to complete the path.
- Find expired and revoked certificates that may be installed in your domain controller certificate store and delete them as appropriate. In a Windows environment, unexpected errors often result if you have duplicates of a certificate installed in a given store or have accidently installed an intermediate CA in the trusted root store or vice versa.
- Lastly, you will need to allow outbound access over port TCP 80 from each domain controller to each of the CRL, OCSP, and AIA distribution points listed in the certificates in the path. For more information, see Path Discovery and Validation (PDVal).
Possible Cause 2 - CA Not in the NTAuth Store
- Follow Steps 1 through 15 for diagnosing Possible Cause 1.
- Confirm that there is no error logged for the task category ”Build Chain” with matching certificate subjectName for the user.
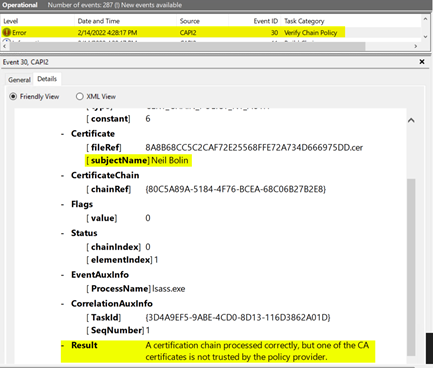
- Look for an error logged for task category ”Verify Chain Policy” with matching certificate subjectName for the user.
- Confirm that the result logged is ”A certification chain processed correctly, but one of the CA certificates is not trusted by the policy provider.”
Resolution
Follow the steps in the Trust Stores Playbook to add the appropriate issuing CA for the PIV card to the Enterprise NTAuth trust store.
Symptom
During smart card logon attempt, the following error is displayed on the logon screen:
The system could not log you on. Your credentials could not be verified.
Possible Cause 1
The incorrect certificate was selected for smart card logon.
Resolution 1
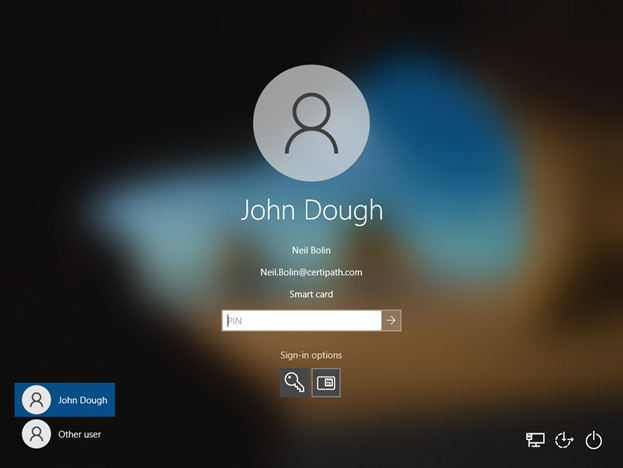
- In the logon screen, select a different certificate from the sign-in options. Note: Logon certificates generally display an account name in the form of an email address or user principal name.
- Try entering the PIN again.
Possible Cause 2
The identifiers listed in the Smart Card Logon certificate on the card cannot be matched to an AD account.
Resolution 2
Follow the suggestions in the Account Linking Playbook to ensure that the card identifier can be linked to the AD account. This may require User Principal Name (UPN) mapping, adding alternate security identifiers added to the AD record, or domain hinting.
Back to Process Overview
Once name mapping and PIV validation are complete, the domain controller sends a logon package to the client computer with the user’s domain permissions and a token that allows desktop logon for that user. If the user is permitted to log in to the computer, they will now be logged into their Windows desktop.
The first logon must always occur while the system has a network connection to the domain controller, whether it is directly attached to the organization’s network or via a VPN. After the first logon, if the Group Policy setting pictured below is set to a value greater than 0, the user’s logon token will be permanently cached by their workstation as long as the number of subsequent users to log in does not exceed this number.
If a future logon is attempted while the user’s workstation is disconnected from the organization’s network, and the logon token is cached, the workstation will only authenticate the PIV authentication certificate via PIN and, upon successful entry, will log the user into their desktop using their cached token and permissions. If the value is set to 0, caching does not occur and logon will only occur when the workstation is connected to the network and can communicate with a domain controller.
Back to Process Overview